
- Difficulty
- Beginner
- Build time
- 35-55 min
- Estimated cost
- $0-$10
- Age range
- 11-16
- Workspace
- A clear table about 90 cm wide
The finish line
What you will build
The enclosed bristlebot travels at least 50 cm on a smooth tray in 30 seconds and keeps its battery and motor secured.
Learning goals
- Identify how 3-volt motor rotation with an eccentric mass produces small forward body motion.
- Construct and explain a rotary imbalance-to-vibration-to-translation system.
- Measure how bristle angle or small ballast position changes performance.
- Diagnose losses caused by random bouncing and bristle drag.
Before you build
Materials, tools, and safety
Reuse-material cost: $0-$3 with reused materials. Supervision: Adult guidance recommended for wiring and cutting.
Tools
- Small screwdriver
- Wire stripper
- Multimeter
- Low-temperature glue gun or tape
Low-cost swaps
- Use alligator-clip leads for a no-solder version.
- Build and test the mechanism manually before adding electronics.
- Use a commercial enclosed vibration motor rather than attaching a loose mass to an exposed shaft.
Wiring table
| From | To | Purpose |
|---|---|---|
| Battery +3 V | Slide switch input | Provide controlled positive supply |
| Switch output | Motor positive | Turn vibration on and off |
| Motor negative | Battery negative | Complete low-voltage circuit |
Project-specific safety
- Use only the listed low-voltage battery supply; never use mains electricity.
- Disconnect power before changing wires and stop if a motor, wire, or battery becomes warm.
- Use an enclosed vibration motor, secure every component, keep small batteries under adult control, and stop if anything warms or loosens.
Orient the build
Place the build so 3-volt motor rotation with an eccentric mass is on your left and small forward body motion is on your right. Call the side facing you the front, the far side the back, the tabletop the bottom, and the opposite face the top.
Build it
Step-by-step instructions
Step 1
Prepare the brush
Have an adult remove and smooth the toothbrush handle.
Keep a broad bristle base.
Step 2
Inspect the motor
Confirm insulated leads and enclosed eccentric mass.
Do not run a bare unbalanced shaft.
Step 3
Place components
Lay motor and battery over the bristle base and find a centered arrangement.
Keep switch reachable.
Builder checkpoint: After place components, the first subassembly should stay aligned when handled gently.
Step 4
Wire with power off
Connect battery positive through the switch to motor positive and motor negative to battery negative.
Insulate every joint.
Watch for: If this stage binds or drifts, inspect motor bearing friction before adding more parts.
Step 5
Secure the motor
Use foam tape plus a cable tie around the brush body.
Keep moving motor shell clear.
Step 6
Secure the battery
Strap the holder so it cannot shift during vibration.
Provide a removable battery compartment.
Builder checkpoint: After secure the battery, operate the build slowly and confirm that small forward body motion begins without binding.
Step 7
Run a tray test
Switch on for five seconds inside a shallow tray.
Stop and inspect every attachment.
Step 8
Tune direction
Change bristle angle by gently warming only with adult-approved methods or add a small rear skid.
Run three 30-second trials.
Builder checkpoint: At the final checkpoint, The enclosed bristlebot travels at least 50 cm on a smooth tray in 30 seconds and keeps its battery and motor secured.
See the engineering
Why it works
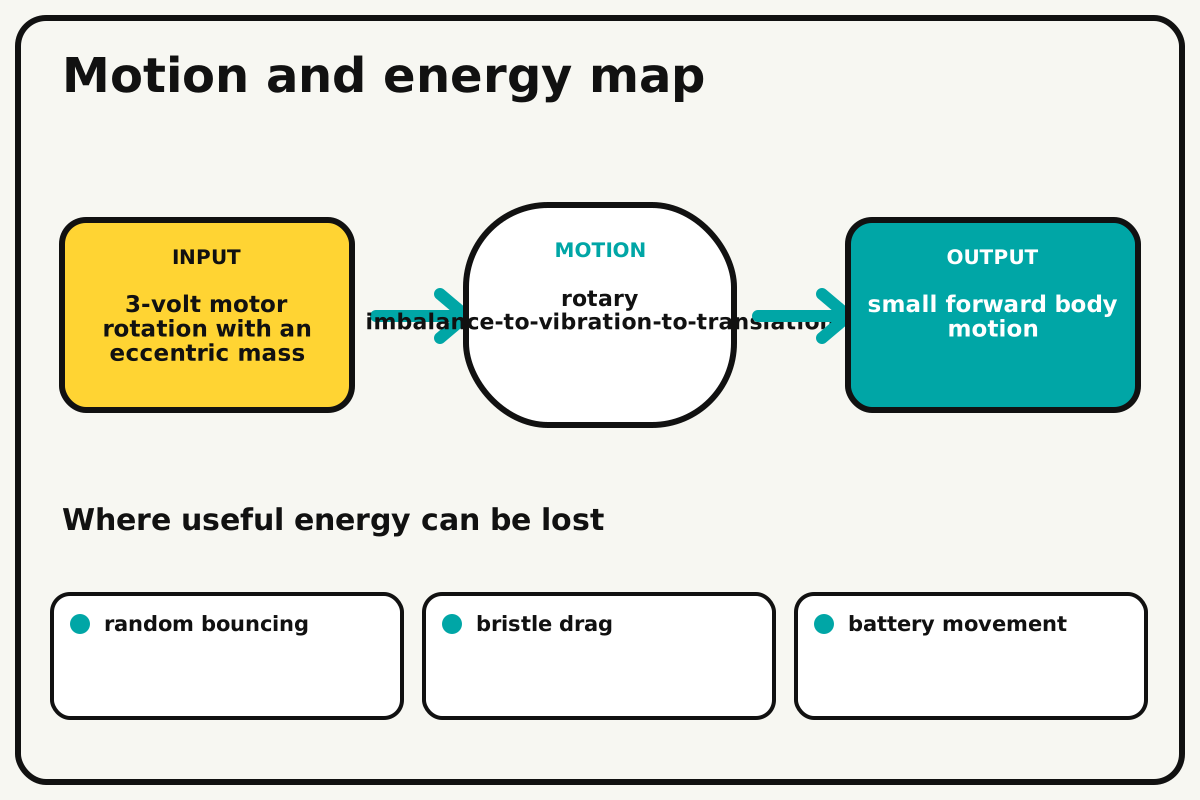
- Input
- 3-volt motor rotation with an eccentric mass
- Output
- small forward body motion
- Motion
- rotary imbalance-to-vibration-to-translation
- Energy losses
- random bouncing, bristle drag, battery movement, motor bearing friction
Why this works
Vibration-driven locomotion
An off-center rotating mass creates a changing force. Angled bristles grip differently during each vibration direction, producing a small net step over many cycles.
Look for: Rotate the bristle angle and compare whether the bot moves forward, backward, or turns.
Where the energy goes
Efficiency and losses
The ideal model leaves out random bouncing, bristle drag, battery movement, motor bearing friction. These effects turn some input energy into heat, sound, vibration, or unwanted motion, so measured performance will be lower than an ideal calculation.
Look for: Run the build slowly and locate the first place where random bouncing becomes visible or audible.
Math bite
Calculate average speed
Formula: speed = distance / time
- Distance = 0.60 m
- Time = 30 s
Substitute: speed = 0.60 / 30 = 0.020 m/s
Result: The bristlebot averages 2 centimetres per second.
Direction may wander even with the same average speed.
The path length is approximated by straight-line distance.
Make it behave
Test, troubleshoot, and tune
Controlled test
Start here: Run for five seconds in a large tray before any timed trial.
Success looks like: The bot travels 50 cm in 30 seconds with all components secured.
Measure: Straight-line distance, path direction, current, and attachment movement.
Change: bristle angle or small ballast position
Keep constant: motor, voltage, tray, run time, battery, and start orientation
- no ballast
- ballast forward
- ballast rearward
| Symptom | Likely cause | Confirm it | Fix |
|---|---|---|---|
| It vibrates in place | Bristles are too vertical or motion is symmetric | View from the side | Angle bristles or shift mass slightly |
| It spins in circles | Mass or bristle field is asymmetric | Rotate the body 180 degrees and repeat | Recenter components and trim bristles evenly |
| The motor stops | Connection is loose under vibration | Wiggle wires with power off | Add strain relief and reconnect |
| Parts move | Tape alone is inadequate | Mark positions before a short run | Add a mechanical strap |
Choose your tradeoff
Secure the electrical parts before chasing speed. More vibration can increase motion but also increases wandering, noise, current, and attachment stress.
Keep experimenting
Try another version
Direction observation
Compare two brush heads without a race.
Straight-lane goal
Stay within a 20 cm-wide track.
Vibration isolation
Add foam layers and compare body motion with measured speed.
Build together
Classroom and access options
Classroom version
Teams can compare bristle angle or small ballast position while keeping motor, voltage, tray, run time, battery, and start orientation. Assign builder, tester, recorder, and explainer roles; have each team predict the result before collecting three trials.
Access adaptations
- Color-code and label every wire at both ends.
- Use clip leads, larger controls, and pre-crimped connectors when fine motor work is difficult.
- Use a large slide switch and build on a tray with bold direction marks.
Reflect on the design
- How did bristle angle or small ballast position change the measured result?
- Where did random bouncing affect the build most strongly?
- What evidence shows that vibration-driven locomotion explains the motion?
- Which change would improve small forward body motion without creating a new problem?
Glossary
- Vibration-driven locomotion
- An off-center rotating mass creates a changing force.
- Input
- The action or energy supplied to a system; here it is 3-volt motor rotation with an eccentric mass.
- Output
- The useful response produced by a system; here it is small forward body motion.
- Efficiency
- The fraction of input energy that becomes useful output instead of friction, sound, heat, or unwanted motion.
Build your dreams
One build can start the next.
Share what you learned, change one variable, and help another builder understand what worked.
Explore more guidesSources and build notes
A platform-agnostic low-voltage robotics or electronics project with original assembly guidance.
- Low-voltage design review: Battery voltage, polarity, component roles, current paths, and motor or LED protection were editorially checked.
Written and edited by BrickLabClips. Published 2026-07-22; updated 2026-07-22.
Next builds
Related guides
Scribblebot
Mount an enclosed vibration motor on a marker tripod and tune mass position to create repeatable drawing patterns.
Robotics/electronicsDrawbot
Build a two-motor differential robot that carries a marker and draws paths from timed wheel commands.
Simple Motorized Fan
Build a guarded low-voltage fan, switch it with a transistor, and compare airflow at two safe blade pitches.