
- Difficulty
- Advanced
- Build time
- 150-240 min
- Estimated cost
- $0-$15
- Age range
- 13-18
- Workspace
- A clear table about 90 cm wide
The finish line
What you will build
The carriage reaches all four bin corners, the claw lowers and returns without tangling, and it lifts a 10-gram paper prize in three of five attempts.
Learning goals
- Identify how hand sliders and a winding crank produces positioned claw lift and release.
- Construct and explain a two linear axes plus vertical hoist system.
- Measure how the claw-finger closing-link position changes performance.
- Diagnose losses caused by carriage rubbing and string twist.
Before you build
Materials, tools, and safety
Reuse-material cost: Usually under $5 with an existing kit. Supervision: Adult help recommended for sharp or heated tools.
Tools
- Ruler
- Pencil
- Scissors
- Low-temperature glue gun or tape
- Hole punch
- Adult-operated craft knife
Low-cost swaps
- Use clean shipping-box cardboard instead of buying sheets.
- Replace hot glue with strong tape and folded tabs.
- Use two crossed dowel rails with drinking-straw sleeves for smoother carriage motion.
Project-specific safety
- An adult should handle craft knives and make difficult starter cuts.
- Let hot glue cool before pressing a joint or testing moving parts.
- Use only soft prizes under 10 grams and keep the hoist string away from necks, hair, and fingers.
Orient the build
Place the build so hand sliders and a winding crank is on your left and positioned claw lift and release is on your right. Call the side facing you the front, the far side the back, the tabletop the bottom, and the opposite face the top.
Build it
Step-by-step instructions
Step 1
Build the enclosure
Brace four corner posts to a wide base and connect them with top beams.
Check diagonal measurements so the top stays square.
Step 2
Install the X rails
Run two parallel rails across the top and reinforce their supports.
Test a sleeve along the full span.
Step 3
Build the X carriage
Join two sleeves with a stiff crossbar that cannot twist.
Add a large side handle.
Builder checkpoint: After build the x carriage, the first subassembly should stay aligned when handled gently.
Step 4
Install the Y rails
Mount a second parallel rail pair on the moving crossbar.
Keep them perpendicular to X travel.
Watch for: If this stage binds or drifts, inspect frame sag before adding more parts.
Step 5
Build the hoist carriage
Make a compact Y slider with a centered drum axle.
Confirm X and Y still move independently.
Step 6
Assemble the claw
Pivot three equal fingers around a center hub and connect a closing ring.
Use rounded tips and light return opening.
Builder checkpoint: After assemble the claw, operate the build slowly and confirm that positioned claw lift and release begins without binding.
Step 7
Route the hoist
Tie string to the claw, wind the drum neatly, and add an anti-overwind stop.
Lower without letting the claw spin.
Step 8
Run pickup trials
Position over marked grid points, lower, close, and lift soft prizes.
Record successes and the failure stage for five attempts.
Builder checkpoint: At the final checkpoint, The carriage reaches all four bin corners, the claw lowers and returns without tangling, and it lifts a 10-gram paper prize in three of five attempts.
See the engineering
Why it works
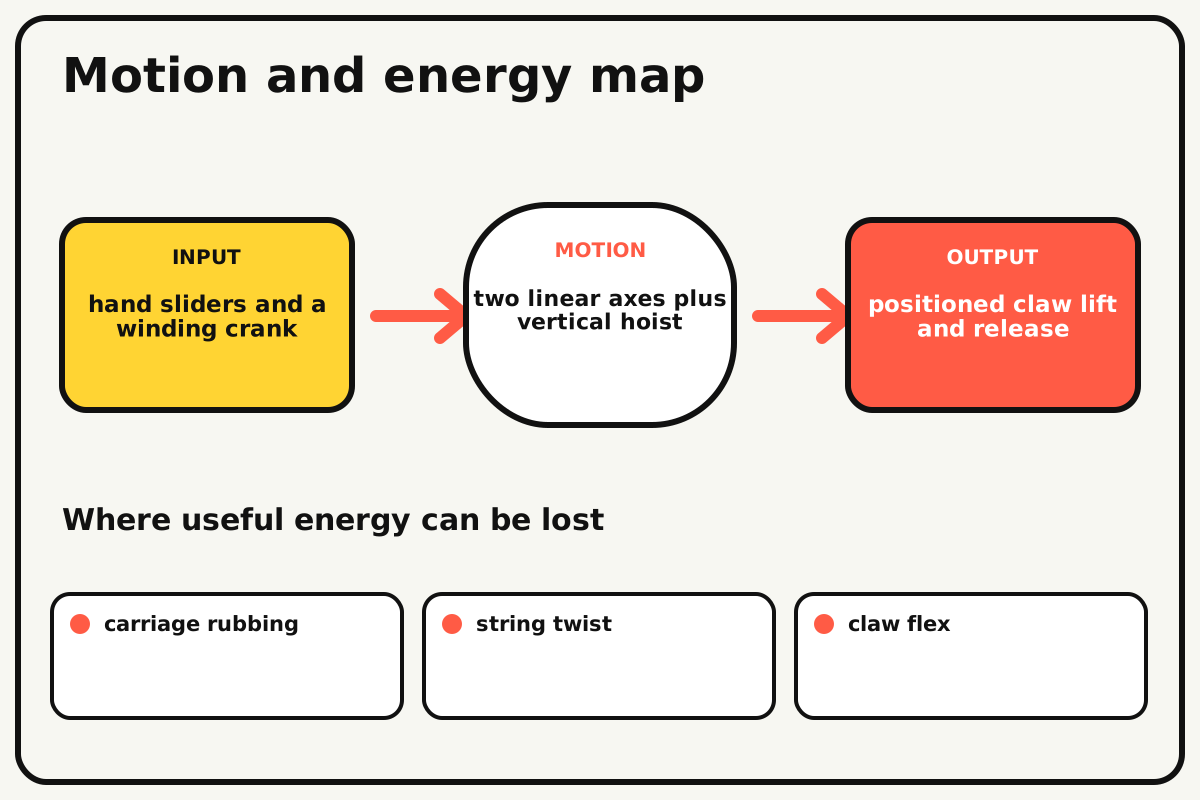
- Input
- hand sliders and a winding crank
- Output
- positioned claw lift and release
- Motion
- two linear axes plus vertical hoist
- Energy losses
- carriage rubbing, string twist, claw flex, frame sag
Why this works
Three-axis positioning
Independent X and Y guides position the hoist above the bin, while the string provides a third vertical axis. Each degree of freedom should move without dragging the others.
Look for: Mark a grid under the claw and test whether each control changes only its intended coordinate.
Where the energy goes
Efficiency and losses
The ideal model leaves out carriage rubbing, string twist, claw flex, frame sag. These effects turn some input energy into heat, sound, vibration, or unwanted motion, so measured performance will be lower than an ideal calculation.
Look for: Run the build slowly and locate the first place where carriage rubbing becomes visible or audible.
Math bite
Find grid position
Formula: position fraction = carriage distance / rail length
- Carriage distance = 30 cm
- Rail length = 40 cm
Substitute: fraction = 30/40 = 0.75
Result: The carriage is 75 percent across that axis.
Separate X and Y fractions describe a point on the bin grid.
Sleeve width reduces usable travel at rail ends.
Make it behave
Test, troubleshoot, and tune
Controlled test
Start here: Move the empty carriage to every corner before attaching a prize load.
Success looks like: Both axes move independently, the claw returns fully, and three of five 10-gram pickups succeed.
Measure: Corner reach, lowering repeatability, and pickup success rate.
Change: the claw-finger closing-link position
Keep constant: prize mass, axis grid, string length, frame, and five attempts
- wide claw opening
- middle setting
- narrow setting
| Symptom | Likely cause | Confirm it | Fix |
|---|---|---|---|
| The carriage jams diagonally | Paired rails are not parallel | Move one sleeve at a time | Realign rails with equal spacing |
| The claw spins and tangles | String is twisted or off-center | Lower empty and watch rotation | Untwist and add a centered swivel loop |
| The frame sags | Top beams are too shallow | Measure center height with carriage present | Laminate or truss the beams |
| The prize falls | Fingers close unevenly or tips are smooth | Grip without lifting and inspect contact | Match links and add paper friction pads |
Choose your tradeoff
Reduce carriage friction before strengthening the claw. A wider claw captures objects more easily but closes with less wrap; a narrow claw grips better only when positioned accurately.
Keep experimenting
Try another version
One-axis pickup
Fix Y position and operate only X plus hoist.
String guide
Add a fairlead that reduces claw swing.
Mechanical interlock
Prevent carriage movement while the claw is lowered.
Build together
Classroom and access options
Classroom version
Teams can compare the claw-finger closing-link position while keeping prize mass, axis grid, string length, frame, and five attempts. Assign builder, tester, recorder, and explainer roles; have each team predict the result before collecting three trials.
Access adaptations
- Pre-cut repeated pieces and mark fold lines with high-contrast ink.
- Use large tabs, binder clips, and tape for easier one-handed assembly.
- Use oversized axis handles, color-coded rails, and a large release lever.
Reflect on the design
- How did the claw-finger closing-link position change the measured result?
- Where did carriage rubbing affect the build most strongly?
- What evidence shows that three-axis positioning explains the motion?
- Which change would improve positioned claw lift and release without creating a new problem?
Glossary
- Three-axis positioning
- Independent X and Y guides position the hoist above the bin, while the string provides a third vertical axis.
- Input
- The action or energy supplied to a system; here it is hand sliders and a winding crank.
- Output
- The useful response produced by a system; here it is positioned claw lift and release.
- Efficiency
- The fraction of input energy that becomes useful output instead of friction, sound, heat, or unwanted motion.
Build your dreams
One build can start the next.
Share what you learned, change one variable, and help another builder understand what worked.
Explore more guidesSources and build notes
An original BrickLabClips cardboard machine with dimensionally specified construction.
- Cardboard design verification: Dimensions, fold allowances, repeated-motion joints, and likely load paths received an editorial geometry review.
Written and edited by BrickLabClips. Published 2026-07-22; updated 2026-07-22.
Next builds
Related guides
Parallel-Jaw Gripper
Synchronize two jaws so their gripping faces stay parallel while moving toward the center.
Cardboard buildsCardboard Conveyor Belt
Move lightweight objects across a frame with two rollers, an endless paper belt, and adjustable tracking guides.
Pulley Elevator
Raise a small platform with fixed and movable pulleys, then compare input force, rope travel, and mechanical advantage.