
- Difficulty
- Intermediate
- Build time
- 75-110 min
- Estimated cost
- $0-$6
- Age range
- 11-17
- Workspace
- A clear table about 90 cm wide
The finish line
What you will build
The moving gear rolls through a complete closed pattern without tooth skipping, and three pen positions produce visibly different curves.
Learning goals
- Identify how hand-guided rolling gear motion produces repeating pen curve.
- Construct and explain a rotary rolling-to-planar drawing path system.
- Measure how the pen-hole radius changes performance.
- Diagnose losses caused by tooth friction and paper drag.
Before you build
Materials, tools, and safety
Reuse-material cost: $0-$3 with reused materials. Supervision: Adult help recommended for sharp or heated tools.
Tools
- Ruler
- Pencil
- Scissors
- Low-temperature glue gun or tape
- Compass
- Adult-operated craft knife
Low-cost swaps
- Use clean shipping-box cardboard instead of buying sheets.
- Replace hot glue with strong tape and folded tabs.
- Use printed circles with evenly spaced peg holes and a string-guided rolling disk.
Project-specific safety
- An adult should handle craft knives and make difficult starter cuts.
- Let hot glue cool before pressing a joint or testing moving parts.
- Use capped washable markers and have an adult cut internal teeth or pen holes.
Orient the build
Place the build so hand-guided rolling gear motion is on your left and repeating pen curve is on your right. Call the side facing you the front, the far side the back, the tabletop the bottom, and the opposite face the top.
Build it
Step-by-step instructions
Step 1
Draw the fixed ring
Mark two concentric circles and divide the inner edge into equal tooth spaces.
Keep the ring at least 3 cm wide.
Step 2
Laminate and cut the ring
Glue layers with crossed corrugation and cut smooth internal teeth.
Tape the outer rim to a drawing board.
Step 3
Build the moving gear
Choose a smaller tooth count that matches the same pitch and laminate it.
Test rolling around the full ring without a pen.
Builder checkpoint: After build the moving gear, the first subassembly should stay aligned when handled gently.
Step 4
Add pen positions
Mark holes at 25, 50, and 75 percent of gear radius.
Reinforce each with a small tape patch.
Watch for: If this stage binds or drifts, inspect hand wobble before adding more parts.
Step 5
Set the drawing surface
Place paper under the ring and secure all corners.
Mark the gear and ring start teeth.
Step 6
Trace the first curve
Insert the marker loosely and roll the gear without lifting or sliding.
Continue until start marks meet again.
Builder checkpoint: After trace the first curve, operate the build slowly and confirm that repeating pen curve begins without binding.
Step 7
Change pen radius
Repeat on clean paper using a farther hole.
Keep gear and ring tooth counts unchanged.
Step 8
Change gear ratio
Use the second moving gear and predict closure before tracing.
Label each drawing with counts and pen radius.
Builder checkpoint: At the final checkpoint, The moving gear rolls through a complete closed pattern without tooth skipping, and three pen positions produce visibly different curves.
See the engineering
Why it works
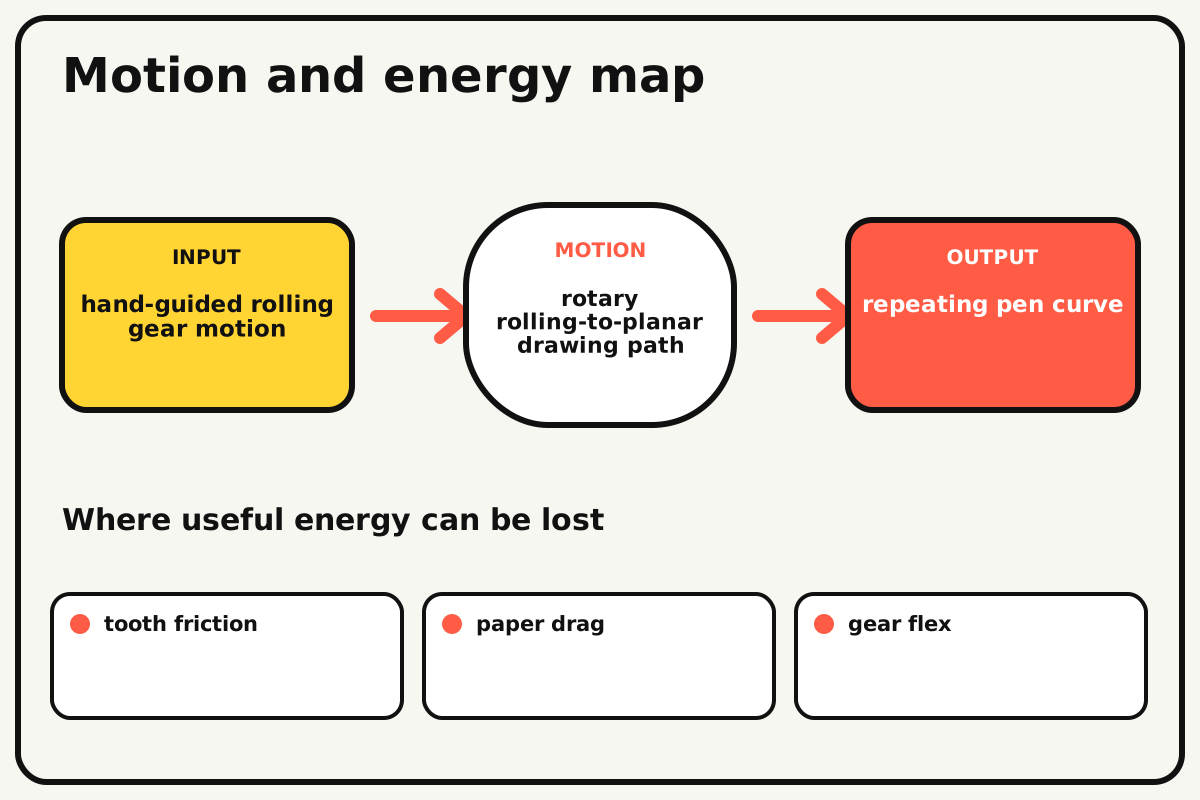
- Input
- hand-guided rolling gear motion
- Output
- repeating pen curve
- Motion
- rotary rolling-to-planar drawing path
- Energy losses
- tooth friction, paper drag, gear flex, hand wobble
Why this works
Periodic rolling geometry
A small gear rolling inside a fixed ring combines rotation about its own center with orbit around the ring center. An off-center pen traces a hypotrochoid whose repeat depends on tooth-count common factors.
Look for: Mark one moving-gear tooth and count its rotations before the pen returns to the start point.
Where the energy goes
Efficiency and losses
The ideal model leaves out tooth friction, paper drag, gear flex, hand wobble. These effects turn some input energy into heat, sound, vibration, or unwanted motion, so measured performance will be lower than an ideal calculation.
Look for: Run the build slowly and locate the first place where tooth friction becomes visible or audible.
Math bite
Predict rotations to close
Formula: ring cycles to close = moving teeth / gcd(ring teeth, moving teeth)
- Ring = 60 teeth
- Moving gear = 24 teeth
- gcd = 12
Substitute: cycles = 24/12 = 2
Result: The pattern closes after two trips around the ring.
Different common factors change repeat length.
Tooth skipping or hand slip can prevent exact closure.
Make it behave
Test, troubleshoot, and tune
Controlled test
Start here: Roll the moving gear around the ring once without a marker.
Success looks like: The gear stays engaged and the traced pattern closes within one tooth of the start mark.
Measure: Closure error and number of ring cycles.
Change: the pen-hole radius
Keep constant: ring, moving gear, tooth counts, paper, marker, and start marks
- inner pen hole
- middle pen hole
- outer pen hole
| Symptom | Likely cause | Confirm it | Fix |
|---|---|---|---|
| The gear skips teeth | Tooth pitch differs or ring flexes | Roll slowly at the failing section | Correct pitch and brace the ring |
| The pattern will not close | A tooth skipped or start was misidentified | Use marked teeth and count cycles | Retrace slowly from aligned marks |
| The marker tears paper | Hole grips tightly or hand force is high | Move with the marker lifted slightly | Widen hole and reduce pressure |
| The moving gear lifts | Hand pushes inward or ring edge is uneven | Practice one dry orbit | Guide from the gear center and smooth edges |
Choose your tradeoff
Accurate tooth pitch matters more than decorative shape. Keep the marker loose and vertical; larger pen radius creates wider curves but magnifies wobble and tooth error.
Keep experimenting
Try another version
Smooth rolling circles
Trace with a string-linked pen before adding teeth.
Closure catalog
Compare gear pairs with different greatest common factors.
Layered patterns
Overlay two colors from different pen radii.
Build together
Classroom and access options
Classroom version
Teams can compare the pen-hole radius while keeping ring, moving gear, tooth counts, paper, marker, and start marks. Assign builder, tester, recorder, and explainer roles; have each team predict the result before collecting three trials.
Access adaptations
- Pre-cut repeated pieces and mark fold lines with high-contrast ink.
- Use large tabs, binder clips, and tape for easier one-handed assembly.
- Use a wide marker grip, high-contrast paper, and large gears with tactile start marks.
Reflect on the design
- How did the pen-hole radius change the measured result?
- Where did tooth friction affect the build most strongly?
- What evidence shows that periodic rolling geometry explains the motion?
- Which change would improve repeating pen curve without creating a new problem?
Glossary
- Periodic rolling geometry
- A small gear rolling inside a fixed ring combines rotation about its own center with orbit around the ring center.
- Input
- The action or energy supplied to a system; here it is hand-guided rolling gear motion.
- Output
- The useful response produced by a system; here it is repeating pen curve.
- Efficiency
- The fraction of input energy that becomes useful output instead of friction, sound, heat, or unwanted motion.
Build your dreams
One build can start the next.
Share what you learned, change one variable, and help another builder understand what worked.
Explore more guidesSources and build notes
An original BrickLabClips cardboard machine with dimensionally specified construction.
- Cardboard design verification: Dimensions, fold allowances, repeated-motion joints, and likely load paths received an editorial geometry review.
Written and edited by BrickLabClips. Published 2026-07-22; updated 2026-07-22.
Next builds
Related guides
Pantograph Drawing Arm
Trace a simple shape and copy it at a different scale with four linked bars and carefully spaced pivots.
Gear Ratio Demonstrator
Turn one crank and compare how gear size changes output speed, direction, and turning force.
Robotics/electronicsDrawbot
Build a two-motor differential robot that carries a marker and draws paths from timed wheel commands.