
- Difficulty
- Beginner
- Build time
- 55-85 min
- Estimated cost
- $0-$6
- Age range
- 10-16
- Workspace
- A clear table about 90 cm wide
The finish line
What you will build
The fully guarded fan moves a hanging tissue strip from 20 cm away and completes twenty crank turns without blade contact or gear slip.
Learning goals
- Identify how hand-crank rotation produces faster fan-blade rotation and airflow.
- Construct and explain a rotary-to-faster rotary airflow system.
- Measure how the blade pitch angle changes performance.
- Diagnose losses caused by bearing friction and belt or gear slip.
Before you build
Materials, tools, and safety
Reuse-material cost: $0-$3 with reused materials. Supervision: Adult help recommended for sharp or heated tools.
Tools
- Ruler
- Pencil
- Scissors
- Low-temperature glue gun or tape
- Straight skewer axles
Low-cost swaps
- Use clean shipping-box cardboard instead of buying sheets.
- Replace hot glue with strong tape and folded tabs.
- Use an equal-pulley direct drive for a slower first version.
Project-specific safety
- An adult should handle craft knives and make difficult starter cuts.
- Let hot glue cool before pressing a joint or testing moving parts.
- Use only paper blades inside a complete guard, wear eye protection, and turn by hand.
Orient the build
Place the build so hand-crank rotation is on your left and faster fan-blade rotation and airflow is on your right. Call the side facing you the front, the far side the back, the tabletop the bottom, and the opposite face the top.
Build it
Step-by-step instructions
Step 1
Build the fan stand
Brace a vertical fan axle support and lower crank support on a wide base.
Leave space for a full guard ring.
Step 2
Install the crank drive
Mount the large driver on a free axle with an outside handle.
Add side collars with running clearance.
Step 3
Install the fan shaft
Place the small driven pulley or gear above the crank and align both planes.
Keep the blade hub outside the transmission.
Builder checkpoint: After install the fan shaft, the first subassembly should stay aligned when handled gently.
Step 4
Make balanced blades
Cut four identical paper blades and fold equal root angles with a jig.
Tape them symmetrically to a small hub.
Watch for: If this stage binds or drifts, inspect frame vibration before adding more parts.
Step 5
Build the guard
Add rings and cross strips in front and behind the complete blade path.
Ensure no opening admits fingers to the blades.
Step 6
Connect the transmission
Fit the belt with moderate tension or set a loose-running gear mesh.
Turn slowly and inspect tracking.
Builder checkpoint: After connect the transmission, operate the build slowly and confirm that faster fan-blade rotation and airflow begins without binding.
Step 7
Measure speed ratio
Mark both shafts and count fan turns for ten crank turns.
Stop if the frame vibrates or blades deform.
Step 8
Compare blade pitch
Test tissue movement at 10, 20, and 30 degree root folds.
Keep crank rate and distance fixed.
Builder checkpoint: At the final checkpoint, The fully guarded fan moves a hanging tissue strip from 20 cm away and completes twenty crank turns without blade contact or gear slip.
See the engineering
Why it works
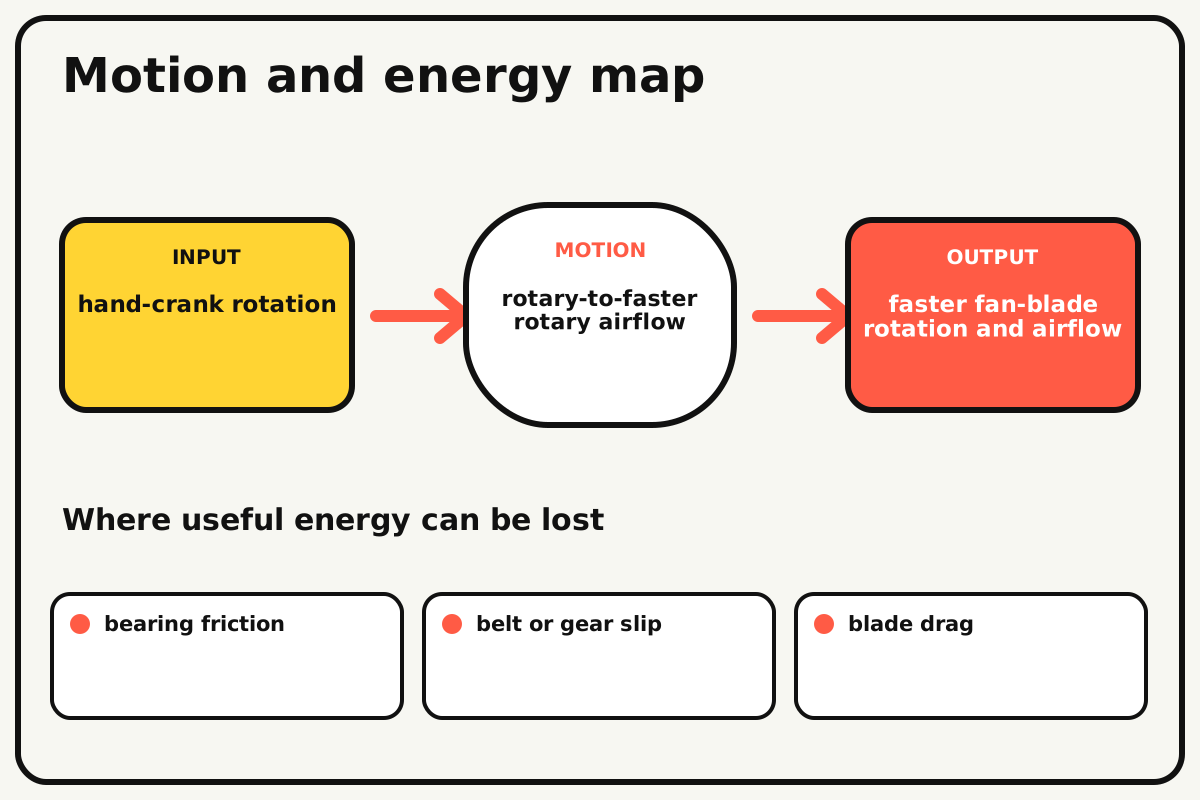
- Input
- hand-crank rotation
- Output
- faster fan-blade rotation and airflow
- Motion
- rotary-to-faster rotary airflow
- Energy losses
- bearing friction, belt or gear slip, blade drag, frame vibration
Why this works
Speed-up transmission
A large driver turning a small driven pulley or gear raises output speed while reducing ideal output torque. Angled lightweight blades push air as they rotate.
Look for: Count crank and fan turns at low speed before using a tissue strip to compare airflow.
Where the energy goes
Efficiency and losses
The ideal model leaves out bearing friction, belt or gear slip, blade drag, frame vibration. These effects turn some input energy into heat, sound, vibration, or unwanted motion, so measured performance will be lower than an ideal calculation.
Look for: Run the build slowly and locate the first place where bearing friction becomes visible or audible.
Math bite
Predict fan speed
Formula: fan turns / crank turns = driver diameter / driven diameter
- Driver = 12 cm
- Driven = 4 cm
Substitute: ratio = 12/4 = 3
Result: Ten crank turns produce about thirty ideal fan turns.
Speed rises while available fan-shaft torque falls.
Belt slip and air drag reduce real speed.
Make it behave
Test, troubleshoot, and tune
Controlled test
Start here: Turn the guarded fan slowly for five crank turns before placing any indicator.
Success looks like: The tissue moves at 20 cm and blades clear the guard for twenty turns.
Measure: Fan turns, tissue angle, and crank force.
Change: the blade pitch angle
Keep constant: crank rate, transmission, tissue, distance, blade count, and guard
- 10 degrees
- 20 degrees
- 30 degrees
| Symptom | Likely cause | Confirm it | Fix |
|---|---|---|---|
| The belt slips | Tension or surface grip is low | Mark belt and pulley rims | Increase tension slightly or add grip tape |
| Blades strike the guard | Hub is off-center or blades differ | Rotate one turn by hand | Recenter and trim to equal radius |
| Little air moves | Blade pitch is low or rotation slow | Observe tissue at 10 cm first | Increase pitch moderately or ratio |
| The frame shakes | Blades are unbalanced | Let the shaft settle and mark heavy side | Match blade mass and angle |
Choose your tradeoff
Light balanced blades respond better than stiff heavy ones. Increase speed only after guard clearance and balance are proven; more blade pitch adds airflow and drag together.
Keep experimenting
Try another version
Direct-drive pinwheel
Mount blades on the crank shaft inside the guard.
Pulley comparison
Test two safe speed-up ratios.
Airflow map
Measure tissue deflection at several distances and angles.
Build together
Classroom and access options
Classroom version
Teams can compare the blade pitch angle while keeping crank rate, transmission, tissue, distance, blade count, and guard. Assign builder, tester, recorder, and explainer roles; have each team predict the result before collecting three trials.
Access adaptations
- Pre-cut repeated pieces and mark fold lines with high-contrast ink.
- Use large tabs, binder clips, and tape for easier one-handed assembly.
- Add a large crank grip and a tissue airflow indicator with high-contrast distance marks.
Reflect on the design
- How did the blade pitch angle change the measured result?
- Where did bearing friction affect the build most strongly?
- What evidence shows that speed-up transmission explains the motion?
- Which change would improve faster fan-blade rotation and airflow without creating a new problem?
Glossary
- Speed-up transmission
- A large driver turning a small driven pulley or gear raises output speed while reducing ideal output torque.
- Input
- The action or energy supplied to a system; here it is hand-crank rotation.
- Output
- The useful response produced by a system; here it is faster fan-blade rotation and airflow.
- Efficiency
- The fraction of input energy that becomes useful output instead of friction, sound, heat, or unwanted motion.
Build your dreams
One build can start the next.
Share what you learned, change one variable, and help another builder understand what worked.
Explore more guidesSources and build notes
An original BrickLabClips cardboard machine with dimensionally specified construction.
- Cardboard design verification: Dimensions, fold allowances, repeated-motion joints, and likely load paths received an editorial geometry review.
Written and edited by BrickLabClips. Published 2026-07-22; updated 2026-07-22.
Next builds
Related guides
Cardboard Wind Turbine
Build a guarded tabletop rotor and compare blade angle, area, and load using a household fan as a repeatable wind source.
Simple Motorized Fan
Build a guarded low-voltage fan, switch it with a transistor, and compare airflow at two safe blade pitches.
Brick-compatible mechanismsBelt Drive Transmission
Link two distant pulleys with an elastic belt and compare ratio, tension, slip, and direction.