
- Difficulty
- Advanced
- Build time
- 140-210 min
- Estimated cost
- $0-$35
- Age range
- 13-18
- Workspace
- A clear table about 90 cm wide
The finish line
What you will build
The guarded conveyor moves five 30-gram packages across 50 cm without belt derailment, stalls, or warm components.
Learning goals
- Identify how low-voltage motor torque through a driver produces continuous belt motion and package transport.
- Construct and explain a rotary motor motion-to-linear belt motion system.
- Measure how belt tension changes performance.
- Diagnose losses caused by roller bearing friction and belt slip.
Before you build
Materials, tools, and safety
Reuse-material cost: Usually under $5 with an existing kit. Supervision: Adult guidance recommended for wiring and cutting.
Tools
- Small screwdriver
- Wire stripper
- Multimeter
- Low-temperature glue gun or tape
Low-cost swaps
- Use alligator-clip leads for a no-solder version.
- Build and test the mechanism manually before adding electronics.
- Hand-crank the conveyor first, then add a commercial low-voltage geared motor module.
Wiring table
| From | To | Purpose |
|---|---|---|
| Battery + and - | Motor driver VM and GND | Supply fused motor power |
| Motor driver output | Geared motor terminals | Control motor current |
| Controller or switch | Driver enable/input | Command on and off |
| Controller GND | Driver and battery GND | Create common reference when controlled electronically |
Project-specific safety
- Use only the listed low-voltage battery supply; never use mains electricity.
- Disconnect power before changing wires and stop if a motor, wire, or battery becomes warm.
- Guard all pinch points, disconnect power before touching the belt, use current-limited low voltage, and stop if the belt jams or electronics warm.
Orient the build
Place the build so low-voltage motor torque through a driver is on your left and continuous belt motion and package transport is on your right. Call the side facing you the front, the far side the back, the tabletop the bottom, and the opposite face the top.
Build it
Step-by-step instructions
Step 1
Build a square frame
Make parallel side rails with three cross braces.
Mark roller centers exactly 50 cm apart.
Step 2
Install the idle roller
Support its shaft on both rails with low-friction bushings.
Add sliding slots for 10 mm tension adjustment.
Step 3
Install the drive roller
Couple the geared motor through a guarded flexible connector.
Support the far shaft end independently.
Builder checkpoint: After install the drive roller, the first subassembly should stay aligned when handled gently.
Step 4
Make the belt loop
Join the strip with a thin overlapped seam square to its edges.
Place the seam on the outside surface.
Watch for: If this stage binds or drifts, inspect frame misalignment before adding more parts.
Step 5
Set light tension
Move the idle roller until slack disappears but shafts still turn freely.
Tighten both sides equally.
Step 6
Wire and guard power
Connect the motor through the rated driver and install an accessible switch.
Cover every coupling and nip point.
Builder checkpoint: After wire and guard power, operate the build slowly and confirm that continuous belt motion and package transport begins without binding.
Step 7
Run low-speed empty tests
Operate for 10, 30, then 60 seconds.
Watch tracking and measure current.
Step 8
Transport packages
Place one 30-gram package at a time from a loading tray.
Run five transfers and record slip or drift.
Builder checkpoint: At the final checkpoint, The guarded conveyor moves five 30-gram packages across 50 cm without belt derailment, stalls, or warm components.
See the engineering
Why it works
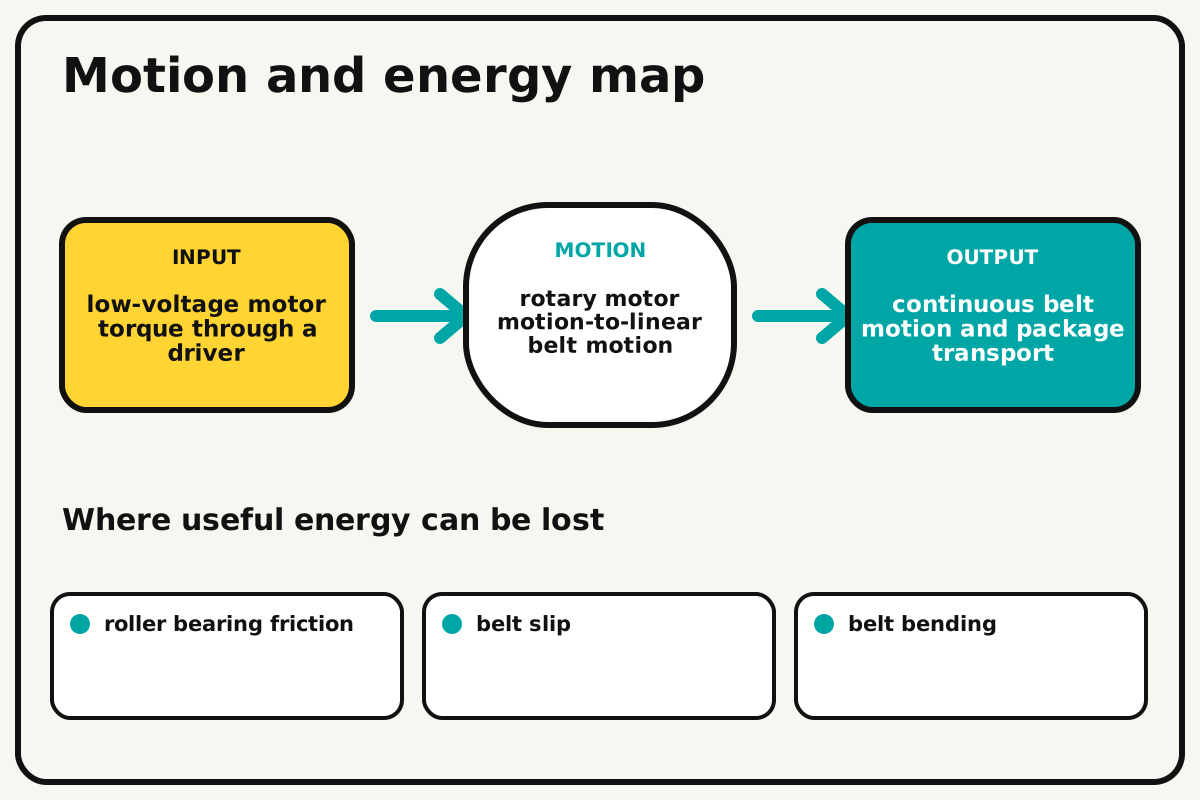
- Input
- low-voltage motor torque through a driver
- Output
- continuous belt motion and package transport
- Motion
- rotary motor motion-to-linear belt motion
- Energy losses
- roller bearing friction, belt slip, belt bending, frame misalignment
Why this works
Friction belt transport
The drive roller pulls the belt through static friction. Enough tension creates traction, but excessive tension increases bearing load and motor current.
Look for: Mark the drive roller and belt; compare their motion when unloaded and under a package.
Where the energy goes
Efficiency and losses
The ideal model leaves out roller bearing friction, belt slip, belt bending, frame misalignment. These effects turn some input energy into heat, sound, vibration, or unwanted motion, so measured performance will be lower than an ideal calculation.
Look for: Run the build slowly and locate the first place where roller bearing friction becomes visible or audible.
Math bite
Estimate belt speed
Formula: belt speed = roller circumference × rotations per second
- Roller diameter = 0.04 m
- Speed = 1.5 rotations/s
Substitute: speed = π × 0.04 × 1.5 = 0.188 m/s
Result: Ideal belt speed is about 0.19 metres per second.
Belt slip lowers actual speed.
Roller compression and speed variation are ignored.
Make it behave
Test, troubleshoot, and tune
Controlled test
Start here: Run the empty guarded belt for ten seconds at low voltage.
Success looks like: Five 30-gram packages travel 50 cm without derailment, stall, or warming.
Measure: Travel time, belt drift, motor current, slip, and temperature after power-off.
Change: belt tension
Keep constant: frame, rollers, motor voltage, package mass, loading point, and guards
- light tension
- medium tension
- higher safe tension
| Symptom | Likely cause | Confirm it | Fix |
|---|---|---|---|
| Belt walks sideways | Rollers are not parallel or tension differs | Mark edge position over ten rotations | Square rollers and adjust both slots |
| Roller spins under belt | Tension or surface grip is low | Watch reference marks | Increase tension slightly or add safe rubber sleeve |
| Motor stalls | Tension is excessive or package jams | Run empty and measure current | Reduce tension and clear guides |
| Frame twists | Motor reaction or belt pull exceeds bracing | Watch rails at startup | Add cross bracing and a separate motor mount |
Choose your tradeoff
Find the lowest tension that prevents slip under the test package. Higher tension improves grip only up to the point where bearing friction and motor current rise sharply.
Keep experimenting
Try another version
Hand-crank version
Move one package without electronics.
Speed control
Use PWM and compare throughput.
Optical counter
Add a sensor that counts packages without touching them.
Build together
Classroom and access options
Classroom version
Teams can compare belt tension while keeping frame, rollers, motor voltage, package mass, loading point, and guards. Assign builder, tester, recorder, and explainer roles; have each team predict the result before collecting three trials.
Access adaptations
- Color-code and label every wire at both ends.
- Use clip leads, larger controls, and pre-crimped connectors when fine motor work is difficult.
- Add a large emergency-off switch, high-contrast belt edges, and a loading tray outside the moving area.
Reflect on the design
- How did belt tension change the measured result?
- Where did roller bearing friction affect the build most strongly?
- What evidence shows that friction belt transport explains the motion?
- Which change would improve continuous belt motion and package transport without creating a new problem?
Glossary
- Friction belt transport
- The drive roller pulls the belt through static friction.
- Input
- The action or energy supplied to a system; here it is low-voltage motor torque through a driver.
- Output
- The useful response produced by a system; here it is continuous belt motion and package transport.
- Efficiency
- The fraction of input energy that becomes useful output instead of friction, sound, heat, or unwanted motion.
Build your dreams
One build can start the next.
Share what you learned, change one variable, and help another builder understand what worked.
Explore more guidesSources and build notes
A platform-agnostic low-voltage robotics or electronics project with original assembly guidance.
- Low-voltage design review: Battery voltage, polarity, component roles, current paths, and motor or LED protection were editorially checked.
Written and edited by BrickLabClips. Published 2026-07-22; updated 2026-07-22.
Next builds
Related guides
Cardboard Conveyor Belt
Move lightweight objects across a frame with two rollers, an endless paper belt, and adjustable tracking guides.
Brick-compatible mechanismsBelt Drive Transmission
Link two distant pulleys with an elastic belt and compare ratio, tension, slip, and direction.
Simple Motorized Fan
Build a guarded low-voltage fan, switch it with a transistor, and compare airflow at two safe blade pitches.