
- Difficulty
- Beginner
- Build time
- 40-65 min
- Estimated cost
- $0-$8
- Age range
- 10-16
- Workspace
- A clear table about 90 cm wide
The finish line
What you will build
The car travels at least 2 metres on a clear floor, releases without hand push, and completes three consistent trials within 25 percent distance spread.
Learning goals
- Identify how pressurized air escaping backward produces forward vehicle acceleration.
- Construct and explain a air jet-to-linear vehicle motion system.
- Measure how the nozzle opening changes performance.
- Diagnose losses caused by axle friction and air leaks.
Before you build
Materials, tools, and safety
Reuse-material cost: $0-$3 with reused materials. Supervision: Adult help recommended for sharp or heated tools.
Tools
- Ruler
- Pencil
- Scissors
- Masking tape
- Clothespin for sealing the nozzle
Low-cost swaps
- Use clean recycled packaging whenever it has similar stiffness.
- Substitute paper clips, binder clips, or twist ties for specialty fasteners.
- Use a reusable party balloon only if it passes a leak test; avoid latex when allergies are present.
Project-specific safety
- Wear eye protection when stretched elastic, magnets, or spinning parts are present.
- Test at floor or tabletop height and keep the path clear of people.
- Balloon pieces are choking hazards; inspect for latex allergies, wear eye protection, and discard damaged balloons immediately.
Orient the build
Place the build so pressurized air escaping backward is on your left and forward vehicle acceleration is on your right. Call the side facing you the front, the far side the back, the tabletop the bottom, and the opposite face the top.
Build it
Step-by-step instructions
Step 1
Build a straight chassis
Mark two perpendicular axle lines on a light flat base.
Keep the rear area clear for the balloon.
Step 2
Install axle bearings
Tape equal straw lengths exactly along the lines.
Test parallel alignment with a ruler.
Step 3
Add axles and wheels
Center all wheels and leave side clearance from the chassis.
Roll unwound to check straightness.
Builder checkpoint: After add axles and wheels, the first subassembly should stay aligned when handled gently.
Step 4
Make an airtight nozzle
Insert the straw a few centimetres into the balloon neck and tape the seal.
Inflate slightly and listen for leaks.
Watch for: If this stage binds or drifts, inspect aerodynamic drag before adding more parts.
Step 5
Mount the balloon
Tape the nozzle along the chassis centerline pointing backward.
Support the balloon without squeezing its expansion.
Step 6
Add a release clip
Inflate through the straw, pinch with a clothespin, and place at the start line.
Keep faces away during inflation.
Builder checkpoint: After add a release clip, operate the build slowly and confirm that forward vehicle acceleration begins without binding.
Step 7
Run three baseline trials
Remove the clip without pushing and measure distance.
Record inflation size and travel time.
Step 8
Compare nozzle openings
Use removable paper sleeves to narrow the same nozzle.
Keep balloon circumference and floor constant.
Builder checkpoint: At the final checkpoint, The car travels at least 2 metres on a clear floor, releases without hand push, and completes three consistent trials within 25 percent distance spread.
See the engineering
Why it works
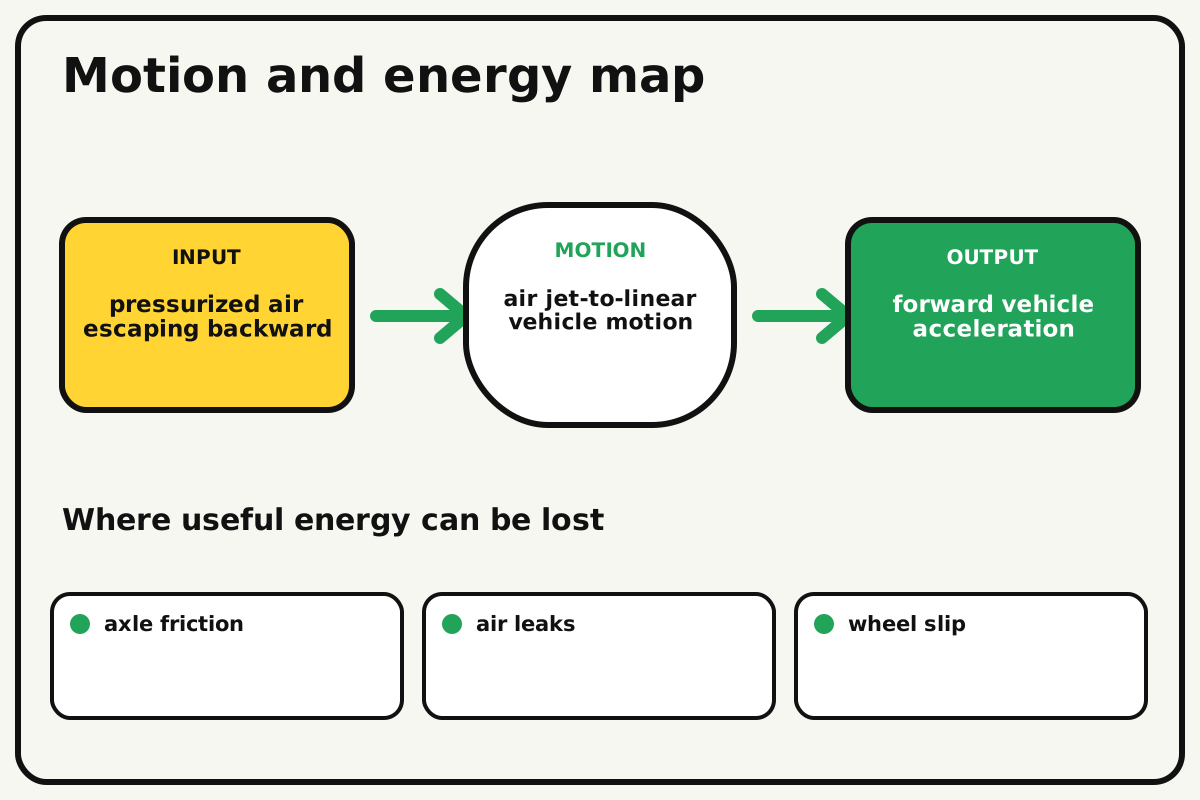
- Input
- pressurized air escaping backward
- Output
- forward vehicle acceleration
- Motion
- air jet-to-linear vehicle motion
- Energy losses
- axle friction, air leaks, wheel slip, aerodynamic drag
Why this works
Action-reaction thrust
The car exerts a backward force on the escaping air, and the air exerts an equal forward force on the car. Thrust lasts only while pressure and airflow remain.
Look for: Point the nozzle straight backward and compare motion with the nozzle angled slightly sideways.
Where the energy goes
Efficiency and losses
The ideal model leaves out axle friction, air leaks, wheel slip, aerodynamic drag. These effects turn some input energy into heat, sound, vibration, or unwanted motion, so measured performance will be lower than an ideal calculation.
Look for: Run the build slowly and locate the first place where axle friction becomes visible or audible.
Math bite
Compare trial consistency
Formula: range percentage = (maximum - minimum) / average × 100%
- Distances = 2.0, 2.2, 2.1 m
- Average = 2.1 m
Substitute: range = 0.2/2.1 × 100% = 9.5%
Result: The three runs vary by about 9.5 percent.
Lower variation suggests a repeatable release.
Balloon pressure is difficult to reproduce exactly.
Make it behave
Test, troubleshoot, and tune
Controlled test
Start here: Roll the car by hand before installing the inflated balloon.
Success looks like: Three releases exceed 2 metres and show less than 25 percent distance spread.
Measure: Travel distance, time, and sideways drift.
Change: the nozzle opening
Keep constant: balloon circumference, car, surface, lane, release, and trial count
- full straw
- medium sleeve
- small sleeve
| Symptom | Likely cause | Confirm it | Fix |
|---|---|---|---|
| Air leaks before release | Balloon-straw seal is loose | Inflate and hold underwater only if latex safe and adult supervised | Retape the dry joint |
| The car spins | Nozzle points sideways or axles misalign | Test rolling without air | Center nozzle and square bearings |
| The balloon rubs wheels | Mount is low or inflation too large | Inflate while lifting the car | Raise support or reduce volume |
| The car barely moves | Nozzle is blocked or rolling friction high | Feel airflow and spin axles separately | Clear nozzle and realign wheels |
Choose your tradeoff
A straight nozzle and low rolling friction make thrust useful. Narrowing the nozzle extends the push but can lower peak force; compare distance and time together.
Keep experimenting
Try another version
One nozzle size
Optimize only straight travel.
Mass study
Add small equal masses and compare acceleration.
Target stop
Tune inflation so the car stops inside a marked zone.
Build together
Classroom and access options
Classroom version
Teams can compare the nozzle opening while keeping balloon circumference, car, surface, lane, release, and trial count. Assign builder, tester, recorder, and explainer roles; have each team predict the result before collecting three trials.
Access adaptations
- Offer pre-cut parts and tactile or high-contrast measurement marks.
- Split roles so one builder can hold, another assemble, and another measure.
- Use a clothespin release and a wide inflation straw so the builder does not need to pinch the nozzle.
Reflect on the design
- How did the nozzle opening change the measured result?
- Where did axle friction affect the build most strongly?
- What evidence shows that action-reaction thrust explains the motion?
- Which change would improve forward vehicle acceleration without creating a new problem?
Glossary
- Action-reaction thrust
- The car exerts a backward force on the escaping air, and the air exerts an equal forward force on the car.
- Input
- The action or energy supplied to a system; here it is pressurized air escaping backward.
- Output
- The useful response produced by a system; here it is forward vehicle acceleration.
- Efficiency
- The fraction of input energy that becomes useful output instead of friction, sound, heat, or unwanted motion.
Build your dreams
One build can start the next.
Share what you learned, change one variable, and help another builder understand what worked.
Explore more guidesSources and build notes
A familiar household engineering activity implemented with original instructions and controlled tests.
- Classroom engineering basis: A common educational challenge implemented with original dimensions, tests, diagrams, and instructions.
Written and edited by BrickLabClips. Published 2026-07-22; updated 2026-07-22.
Next builds
Related guides
Rubber Band Car
Store energy in a twisted rubber band, release it through the drive axle, and tune a lightweight car for distance.
Household engineeringBalloon Hovercraft
Release balloon air beneath a lightweight disk to create a thin cushion that reduces sliding friction.
Household engineeringWind-Powered Sail Car
Capture airflow with an adjustable paper sail and tune a lightweight rolling chassis for speed and straight travel.