
- Difficulty
- Intermediate
- Build time
- 75-120 min
- Estimated cost
- $0-$20
- Age range
- 12-17
- Workspace
- A clear table about 90 cm wide
The finish line
What you will build
Five labeled keys each trigger the correct note in nine of ten presses without neighboring false triggers.
Learning goals
- Identify how finger contact changing key capacitance produces five mapped audio notes.
- Construct and explain a touch event-to-digital sound output system.
- Measure how key spacing or threshold changes performance.
- Diagnose losses caused by electrical noise and key coupling.
Before you build
Materials, tools, and safety
Reuse-material cost: Usually under $5 with an existing kit. Supervision: Adult guidance recommended for wiring and cutting.
Tools
- Small screwdriver
- Wire stripper
- Multimeter
- Low-temperature glue gun or tape
Low-cost swaps
- Use alligator-clip leads for a no-solder version.
- Build and test the mechanism manually before adding electronics.
- Use a classroom board with built-in capacitive pads and attach larger foil keys by alligator leads.
Wiring table
| From | To | Purpose |
|---|---|---|
| Five foil keys | Five supported touch inputs through required resistors | Measure individual touch events |
| Piezo positive | Tone-capable pin 9 | Generate note frequencies |
| Piezo negative | GND | Complete audio circuit |
| USB | Controller | Supply isolated low-voltage power |
Project-specific safety
- Use only the listed low-voltage battery supply; never use mains electricity.
- Disconnect power before changing wires and stop if a motor, wire, or battery becomes warm.
- Use USB or battery low voltage only, smooth and tape foil edges, and never connect touch pads to outlets or unknown equipment.
Orient the build
Place the build so finger contact changing key capacitance is on your left and five mapped audio notes is on your right. Call the side facing you the front, the far side the back, the tabletop the bottom, and the opposite face the top.
Build it
Step-by-step instructions
Step 1
Build five keys
Wrap identical card rectangles with smooth foil and tape every edge.
Leave a rear connection tab.
Step 2
Space the keyboard
Mount keys with at least 1 cm gaps on a nonconductive base.
Label C through G.
Step 3
Connect touch channels
Wire each tab to a separate supported sensing pin with required resistor arrangement.
Keep leads separated.
Builder checkpoint: After connect touch channels, the first subassembly should stay aligned when handled gently.
Step 4
Add the speaker
Connect a passive piezo to the chosen tone pin and ground.
Keep volume comfortable.
Watch for: If this stage binds or drifts, inspect ground variation before adding more parts.
Step 5
Read baselines
Log every key untouched for ten seconds and record normal ranges.
Avoid touching the desk during this step.
Step 6
Set per-key thresholds
Touch each key ten times and choose a threshold between baseline and touch values.
Do not assume all keys match.
Builder checkpoint: After set per-key thresholds, operate the build slowly and confirm that five mapped audio notes begins without binding.
Step 7
Map notes
Assign C4, D4, E4, F4, and G4 frequencies.
Play only the highest-confidence active key.
Step 8
Run isolation trials
Press each key ten times and record correct, missed, and neighboring triggers.
Increase spacing or tune thresholds.
Builder checkpoint: At the final checkpoint, Five labeled keys each trigger the correct note in nine of ten presses without neighboring false triggers.
See the engineering
Why it works
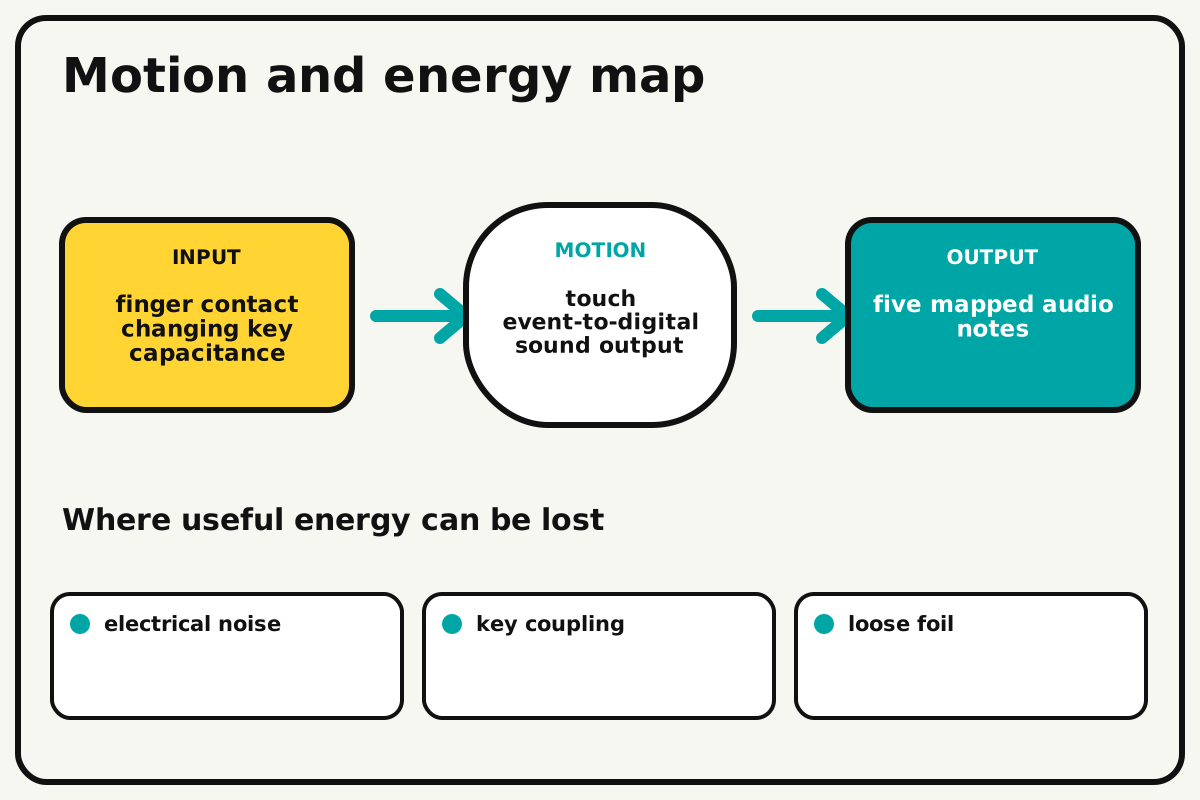
- Input
- finger contact changing key capacitance
- Output
- five mapped audio notes
- Motion
- touch event-to-digital sound output
- Energy losses
- electrical noise, key coupling, loose foil, ground variation
Why this works
Capacitive touch sensing
A conductive pad and the surrounding environment form a small capacitor. Touch adds body capacitance, changing measured charge time or sensor value enough to cross a calibrated threshold.
Look for: Log baseline and touched readings for each key before enabling sound.
Where the energy goes
Efficiency and losses
The ideal model leaves out electrical noise, key coupling, loose foil, ground variation. These effects turn some input energy into heat, sound, vibration, or unwanted motion, so measured performance will be lower than an ideal calculation.
Look for: Run the build slowly and locate the first place where electrical noise becomes visible or audible.
Math bite
Calculate key reliability
Formula: reliability = correct triggers / presses × 100%
- Correct triggers = 9
- Presses = 10
Substitute: reliability = 9 / 10 × 100% = 90%
Result: This key triggers correctly 90 percent of the time.
Each key needs its own result.
Humidity and grounding can change sensitivity.touch_piano.ino
A complete example for boards whose supported touchRead function returns larger values when touched; calibrate pins and thresholds for your board.
const int keys[5]={4,5,6,7,8};
const int notes[5]={262,294,330,349,392};
const int thresholds[5]={35,35,35,35,35}; const int buzzer=9;
void setup(){ pinMode(buzzer,OUTPUT); }
void loop(){
  int active=-1, strongest=0;
  for(int i=0;i<5;i++){
    int value=touchRead(keys[i]);
    if(value>thresholds[i] && value>strongest){ strongest=value; active=i; }
  }
  if(active>=0) tone(buzzer,notes[active]); else noTone(buzzer);
  delay(15);
}
Make it behave
Test, troubleshoot, and tune
Controlled test
Start here: Log untouched and touched values before connecting the buzzer logic.
Success looks like: Every key produces its mapped note in nine of ten presses with no adjacent false trigger.
Measure: Correct notes, misses, false triggers, baseline, and touch values.
Change: key spacing or threshold
Keep constant: controller, wiring, operator, room, key size, and sample count
- 0.5 cm gaps
- 1 cm gaps
- 2 cm gaps
| Symptom | Likely cause | Confirm it | Fix |
|---|---|---|---|
| Keys trigger untouched | Threshold is too low or wires couple | Log baseline with hands away | Raise threshold and separate leads |
| Touches are missed | Foil connection or threshold is poor | Measure the raw touched range | Resecure foil and lower threshold carefully |
| Two notes play | Keys are too close or code accepts multiple channels | Touch one center and inspect readings | Increase spacing and choose one active key |
| Tone is wrong | Frequency mapping or pin differs | Print detected key label | Correct the note table |
Choose your tradeoff
Calibrate each key in the actual room before changing sound code. More sensitivity helps light touches but increases false triggers from nearby hands and wiring.
Keep experimenting
Try another version
Three-note keyboard
Use three large keys.
Dynamic duration
Hold the note while touch remains stable.
Chord mode
Detect separated simultaneous keys and manage priority safely.
Build together
Classroom and access options
Classroom version
Teams can compare key spacing or threshold while keeping controller, wiring, operator, room, key size, and sample count. Assign builder, tester, recorder, and explainer roles; have each team predict the result before collecting three trials.
Access adaptations
- Color-code and label every wire at both ends.
- Use clip leads, larger controls, and pre-crimped connectors when fine motor work is difficult.
- Make keys 10 cm wide with raised note labels and provide an alternate button keyboard.
Reflect on the design
- How did key spacing or threshold change the measured result?
- Where did electrical noise affect the build most strongly?
- What evidence shows that capacitive touch sensing explains the motion?
- Which change would improve five mapped audio notes without creating a new problem?
Glossary
- Capacitive touch sensing
- A conductive pad and the surrounding environment form a small capacitor.
- Input
- The action or energy supplied to a system; here it is finger contact changing key capacitance.
- Output
- The useful response produced by a system; here it is five mapped audio notes.
- Efficiency
- The fraction of input energy that becomes useful output instead of friction, sound, heat, or unwanted motion.
Build your dreams
One build can start the next.
Share what you learned, change one variable, and help another builder understand what worked.
Explore more guidesSources and build notes
A platform-agnostic low-voltage robotics or electronics project with original assembly guidance.
- Low-voltage design review: Battery voltage, polarity, component roles, current paths, and motor or LED protection were editorially checked.
Written and edited by BrickLabClips. Published 2026-07-22; updated 2026-07-22.
Next builds
Related guides
Cardboard Arcade Button
Build a large springy push button that closes a foil contact and can trigger a low-voltage game input or continuity test.
Robotics/electronicsConductivity Tester
Use a current-limited LED probe to compare whether common dry materials complete a low-voltage circuit.
Scratch Arcade Game
Build a keyboard-controlled collecting game with falling objects, lives, score, speed progression, and a clear restart loop.