
- Difficulty
- Beginner
- Build time
- 60-90 min
- Estimated cost
- $0
- Age range
- 10-16
- Workspace
- A computer or tablet workspace
The finish line
What you will build
The game starts from a green-flag reset, creates falling objects, updates score and lives correctly, speeds up, and reaches a game-over state.
Learning goals
- Identify how left and right keyboard events produces player motion, score, lives, and game state.
- Construct and explain a discrete input-to-sprite movement and falling-object loops system.
- Measure how starting speed changes performance.
- Diagnose losses caused by frame timing and collision edge cases.
Before you build
Materials, tools, and safety
Reuse-material cost: $0-$3 with reused materials. Supervision: Adult help recommended for sharp or heated tools.
Tools
- Computer or tablet
- Web browser or offline editor
- Notebook for test results
Low-cost swaps
- Use the platform's offline editor when internet access is limited.
- Storyboard the logic with cards and arrows before opening the coding tool.
- Use the offline Scratch editor and draw only simple geometric sprites when internet or asset access is limited.
Project-specific safety
- Use a teacher, parent, or guardian account where the platform requires an adult.
- Do not publish student names, locations, or personal contact details inside a project.
- Use an adult-managed account when required, keep projects private until approved, and do not include student names, photos, locations, or contact information.
Orient the build
Treat the screen origin and stage edges as fixed references. The control that creates left and right keyboard events is the input side; the sprite, score, or display that produces player motion, score, lives, and game state is the output side.
Build it
Step-by-step instructions
Step 1
Define the game states
Create variables score, lives, speed, and running.
Write the start and game-over conditions.
Step 2
Build the player
Place a wide original sprite near the bottom and constrain horizontal motion.
Add arrow and A/D controls.
Step 3
Reset on green flag
Set score to 0, lives to 3, speed to 4, and running to 1.
Move the player to its start.
Builder checkpoint: After reset on green flag, the first subassembly should stay aligned when handled gently.
Step 4
Create falling clones
Hide the source object and create a clone once per second while running.
Limit creation after game over.
Watch for: If this stage binds or drifts, inspect unbounded clone creation before adding more parts.
Step 5
Program clone motion
Start each clone at a random top x position and move downward by speed.
Delete it after a catch or miss.
Step 6
Score catches
If a clone touches the player, add one score and play a short original tone.
Increase speed every five points.
Builder checkpoint: After score catches, operate the build slowly and confirm that player motion, score, lives, and game state begins without binding.
Step 7
Handle misses
If the clone passes the bottom, subtract one life and delete it.
Set running to 0 when lives reach zero.
Step 8
Test and polish
Run ten catches and ten misses intentionally.
Fix duplicate scoring, clone leaks, and restart behavior.
Builder checkpoint: At the final checkpoint, The game starts from a green-flag reset, creates falling objects, updates score and lives correctly, speeds up, and reaches a game-over state.
See the engineering
Why it works
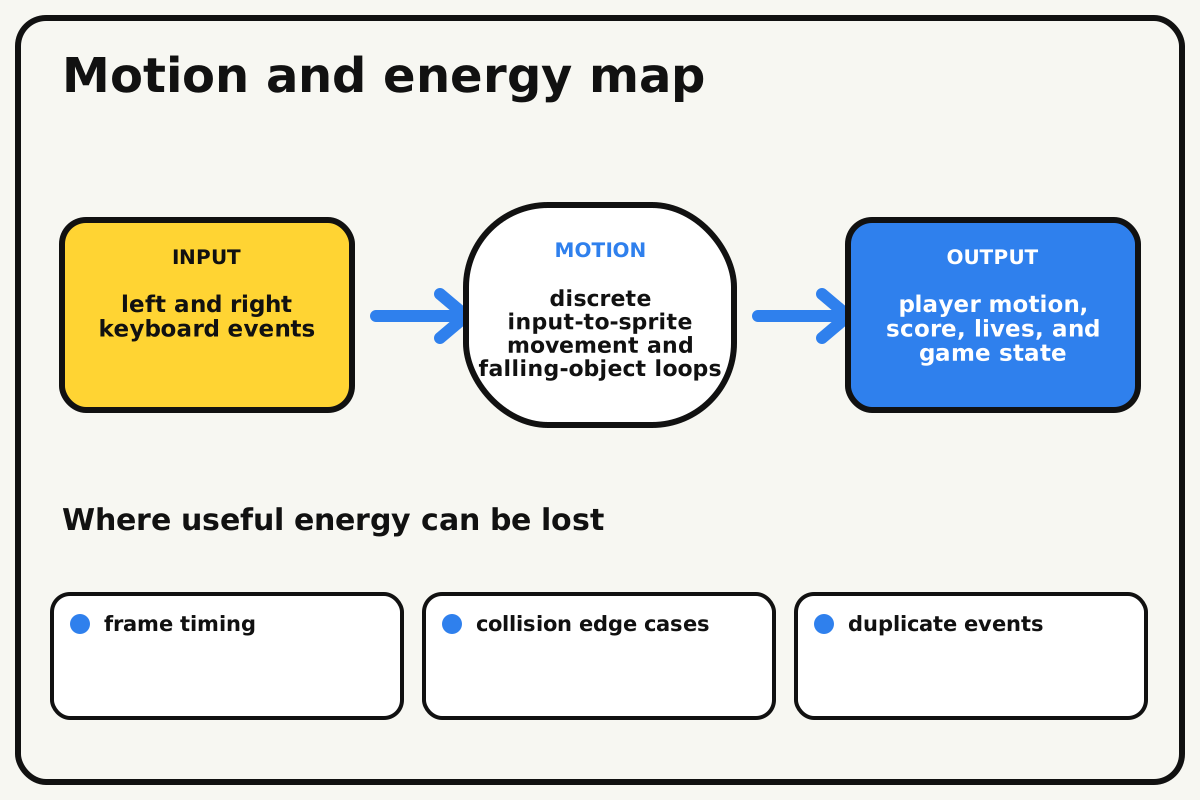
- Input
- left and right keyboard events
- Output
- player motion, score, lives, and game state
- Motion
- discrete input-to-sprite movement and falling-object loops
- Energy losses
- frame timing, collision edge cases, duplicate events, unbounded clone creation
Why this works
Event-driven game loop
Events start scripts, while repeated loops update position and test collisions. Shared variables keep score, lives, speed, and the running state synchronized across clones.
Look for: Display the speed variable and note how clone travel changes after every five catches.
Where the energy goes
Efficiency and losses
The ideal model leaves out frame timing, collision edge cases, duplicate events, unbounded clone creation. These effects turn some input energy into heat, sound, vibration, or unwanted motion, so measured performance will be lower than an ideal calculation.
Look for: Run the build slowly and locate the first place where frame timing becomes visible or audible.
Math bite
Set a difficulty increase
Formula: speed = base speed + floor(score / 5)
- Base speed = 4
- Score = 13
Substitute: speed = 4 + floor(13 / 5) = 6
Result: At 13 points, falling speed is 6 steps per frame.
Difficulty rises once for every five points.
Actual screen speed depends on frame timing and device performance.scratch_arcade_scripts.txt
A complete block-by-block script plan using only built-in Scratch events, variables, clones, sensing, and motion.
STAGE — when green flag clicked
stop all sounds
set [score] to 0
set [lives] to 3
set [speed] to 4
set [running] to 1
broadcast [reset]
wait until <(lives) = 0>
set [running] to 0
broadcast [game over]

PLAYER — when I receive [reset]
go to x:0 y:-145
show
forever
  if <(running) = 1> then
    if <<key [right arrow] pressed?> or <key [d] pressed?>> then change x by 8
    if <<key [left arrow] pressed?> or <key [a] pressed?>> then change x by -8
    if <(x position) > 205> then set x to 205
    if <(x position) < -205> then set x to -205
  end
end

OBJECT — when green flag clicked
hide
forever
  if <(running) = 1> then create clone of [myself]
  wait 1 seconds
end

OBJECT — when I start as a clone
go to x:(pick random -210 to 210) y:175
show
repeat until <<touching [Player]?> or <(y position) < -175>>
  change y by ((0) - (speed))
  wait 0.03 seconds
end
if <touching [Player]?> then
  change [score] by 1
  set [speed] to ((4) + (floor ((score) / 5)))
else
  change [lives] by -1
end
delete this clone
Make it behave
Test, troubleshoot, and tune
Controlled test
Start here: Run the reset script twice before playing to confirm variables and clones return to one clean state.
Success looks like: Ten intentional catches and misses produce correct score, lives, speed, and game-over behavior.
Measure: Score changes, lives, active clones, frame feel, and restart success.
Change: starting speed
Keep constant: sprites, controls, spawn interval, collision rules, screen size, and test script
- speed 3
- speed 4
- speed 5
| Symptom | Likely cause | Confirm it | Fix |
|---|---|---|---|
| One catch adds many points | Collision remains true for several frames | Watch score during one overlap | Delete clone immediately after scoring |
| Objects remain after game over | Clone loop ignores running state | Set lives to zero during a test | Check running inside clone and spawner loops |
| Player leaves the screen | Position is never clamped | Hold one movement key | Limit x to stage boundaries |
| Restart keeps old objects | Existing clones do not receive reset | Press green flag after many clones | Broadcast reset or stop all before initialization |
Choose your tradeoff
Change one difficulty variable at a time. Faster falling raises challenge, but spawn rate, player width, and screen size also affect fairness.
Keep experimenting
Try another version
Practice mode
Use five lives and slower objects.
Combo scoring
Reward consecutive catches while resetting on a miss.
Object types
Add rare bonus and penalty clones with clearly different shapes.
Build together
Classroom and access options
Classroom version
Teams can compare starting speed while keeping sprites, controls, spawn interval, collision rules, screen size, and test script. Assign builder, tester, recorder, and explainer roles; have each team predict the result before collecting three trials.
Access adaptations
- Use keyboard-accessible controls and high-contrast sprites or interface elements.
- Pair a navigator who reads instructions with a driver who enters blocks or code.
- Add A/D keys as alternatives, use high-contrast large sprites, and provide a slower starting speed setting.
Reflect on the design
- How did starting speed change the measured result?
- Where did frame timing affect the build most strongly?
- What evidence shows that event-driven game loop explains the motion?
- Which change would improve player motion, score, lives, and game state without creating a new problem?
Glossary
- Event-driven game loop
- Events start scripts, while repeated loops update position and test collisions.
- Input
- The action or energy supplied to a system; here it is left and right keyboard events.
- Output
- The useful response produced by a system; here it is player motion, score, lives, and game state.
- Efficiency
- The fraction of input energy that becomes useful output instead of friction, sound, heat, or unwanted motion.
Build your dreams
One build can start the next.
Share what you learned, change one variable, and help another builder understand what worked.
Explore more guidesSources and build notes
A platform-appropriate educational coding project with original logic and instruction.
- Programming project basis: A platform-appropriate educational project with complete logic, setup instructions, debugging, and original examples.
Written and edited by BrickLabClips. Published 2026-07-22; updated 2026-07-22.
Next builds
Related guides
Reaction-Time Game
Create an unpredictable on-screen cue, reject early presses, measure reaction time, and summarize five trials.
Coding/game projectsMakeCode Physics Platformer
Create a tile-based platformer with gravity, jumping, coins, hazards, camera follow, and a complete win-and-restart loop.
Cardboard Arcade Button
Build a large springy push button that closes a foil contact and can trigger a low-voltage game input or continuity test.