
- Difficulty
- Beginner
- Build time
- 40-65 min
- Estimated cost
- $0-$6
- Age range
- 10-16
- Workspace
- A clear table about 90 cm wide
The finish line
What you will build
The carrier moves a 50-gram payload along a 2-metre low line and stops inside a 30 cm target on four of five runs.
Learning goals
- Identify how release from the raised end of a sloped line produces payload travel and controlled stop.
- Construct and explain a gravitational descent-to-linear carrier motion system.
- Measure how brake length changes performance.
- Diagnose losses caused by line friction and carrier swing.
Before you build
Materials, tools, and safety
Reuse-material cost: $0-$3 with reused materials. Supervision: Adult help recommended for sharp or heated tools.
Tools
- Ruler
- Pencil
- Scissors
- Timer or phone stopwatch
Low-cost swaps
- Use reclaimed paper and packaging while keeping material limits equal for every team.
- Replace metal test weights with labeled bags of coins or washers.
- Use a large paper-clip hook sliding on string if a spool is unavailable, and keep the slope gentle.
Project-specific safety
- Keep load and drop tests below shoulder height and away from faces.
- Clear the test zone before releasing moving objects or suspended loads.
- Keep the line below shoulder height, use lightweight cargo, pad both ends, and keep faces and hands out of the travel path.
Orient the build
Place the build so release from the raised end of a sloped line is on your left and payload travel and controlled stop is on your right. Call the side facing you the front, the far side the back, the tabletop the bottom, and the opposite face the top.
Build it
Step-by-step instructions
Step 1
Set the low line
Secure two supports 2 metres apart with a 30 cm height difference.
Pull the cord taut but not enough to tip supports.
Step 2
Build the carrier
Suspend a small basket below a grooved wheel or broad hook.
Keep the payload beneath the line for stability.
Step 3
Add a release tab
Hold the carrier with a card gate instead of fingers.
Mark one exact start position.
Builder checkpoint: After add a release tab, the first subassembly should stay aligned when handled gently.
Step 4
Pad the finish
Wrap the final support and place a towel beneath.
Mark a 30 cm stopping zone before it.
Watch for: If this stage binds or drifts, inspect brake deformation before adding more parts.
Step 5
Run empty trials
Release the carrier three times without cargo.
Watch swing and wheel alignment.
Step 6
Add the payload
Center 50 grams in a sealed bag and secure it in the basket.
Confirm the carrier hangs level.
Builder checkpoint: After add the payload, operate the build slowly and confirm that payload travel and controlled stop begins without binding.
Step 7
Build a brake
Add a paper brush, sponge contact, or line flag near the finish.
Start with light contact.
Step 8
Tune five runs
Change only brake length or position and record stopping point.
Score runs ending fully inside the zone.
Builder checkpoint: At the final checkpoint, The carrier moves a 50-gram payload along a 2-metre low line and stops inside a 30 cm target on four of five runs.
See the engineering
Why it works
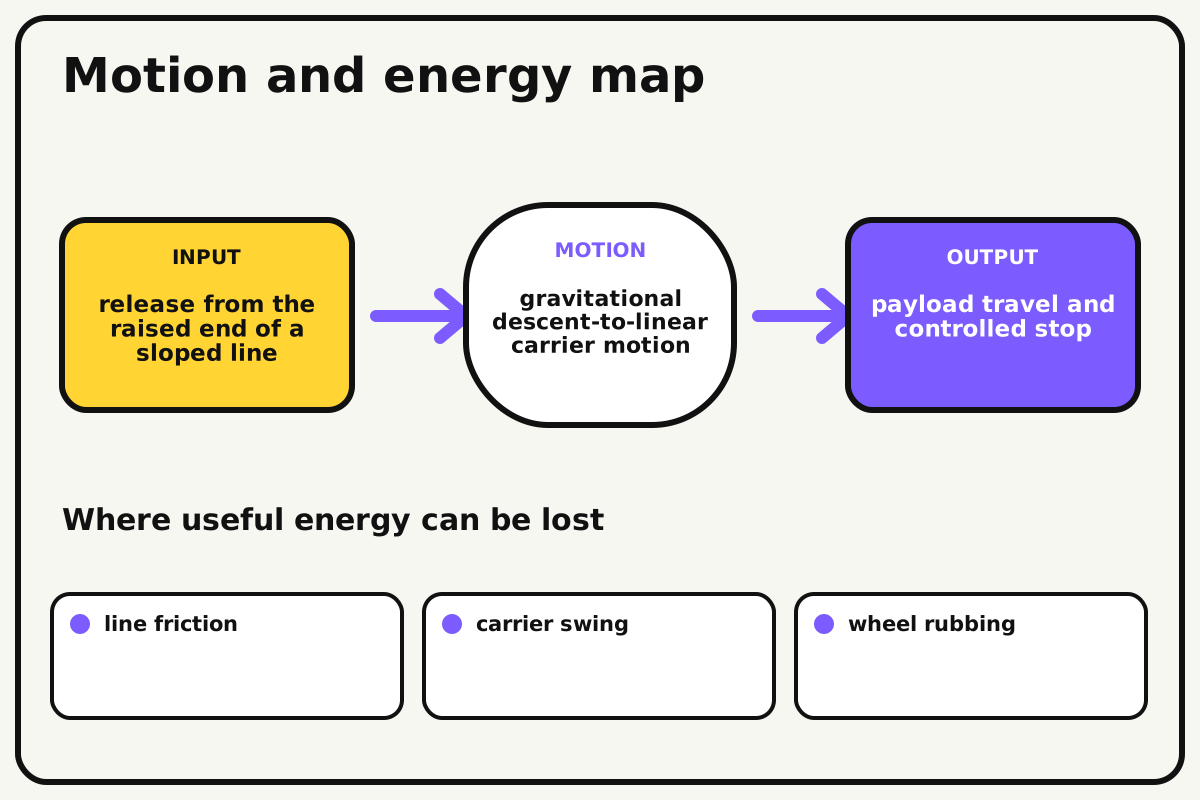
- Input
- release from the raised end of a sloped line
- Output
- payload travel and controlled stop
- Motion
- gravitational descent-to-linear carrier motion
- Energy losses
- line friction, carrier swing, wheel rubbing, brake deformation
Why this works
Slope-driven transport
The height difference provides gravitational energy. Friction and a deformable brake remove that energy so the carrier can stop near a target instead of striking the support.
Look for: Mark the line every 50 cm and compare speed changes before and during braking.
Where the energy goes
Efficiency and losses
The ideal model leaves out line friction, carrier swing, wheel rubbing, brake deformation. These effects turn some input energy into heat, sound, vibration, or unwanted motion, so measured performance will be lower than an ideal calculation.
Look for: Run the build slowly and locate the first place where line friction becomes visible or audible.
Math bite
Find height-based potential energy
Formula: energy = mass × g × height drop
- Mass = 0.08 kg
- g = 9.8 m/s²
- Drop = 0.30 m
Substitute: energy = 0.08 × 9.8 × 0.30 = 0.235 J
Result: About 0.24 joules are available before friction.
The brake must remove the remaining kinetic energy safely.
Line sag and rolling friction reduce motion.
Make it behave
Test, troubleshoot, and tune
Controlled test
Start here: Release the empty carrier once while an adult guards the finish.
Success looks like: With 50 grams, four of five runs stop inside the 30 cm target.
Measure: Stopping position, travel time, swing angle, and brake contact.
Change: brake length
Keep constant: line, slope, carrier, cargo, start, and finish padding
- short brake
- medium brake
- long brake
| Symptom | Likely cause | Confirm it | Fix |
|---|---|---|---|
| The carrier falls off | Wheel groove is shallow or line sags | Move it slowly by hand | Use a deeper guide and tension the line safely |
| It swings badly | Payload is high or off-center | Hang motionless and release | Lower and center the cargo |
| It stops too early | Brake contact is excessive | Mark the first contact point | Shorten or move the brake later |
| It hits the support | Brake is weak or slope too steep | Run empty and guard the finish | Increase braking and reduce height difference |
Choose your tradeoff
Stabilize the carrier before adjusting speed. More slope improves reliable starts but increases braking demand and impact risk.
Keep experimenting
Try another version
Empty delivery
Stop the carrier with no cargo.
Precision score
Measure absolute distance from target center.
Release package
Design a mechanical drop-off inside the target.
Build together
Classroom and access options
Classroom version
Teams can compare brake length while keeping line, slope, carrier, cargo, start, and finish padding. Assign builder, tester, recorder, and explainer roles; have each team predict the result before collecting three trials.
Access adaptations
- Assign varied roles such as designer, builder, tester, recorder, and presenter.
- Provide pre-measured materials and a visual checklist when helpful.
- Use a large release lever, bold distance markers, and separate roles for loading, releasing, timing, and catching.
Reflect on the design
- How did brake length change the measured result?
- Where did line friction affect the build most strongly?
- What evidence shows that slope-driven transport explains the motion?
- Which change would improve payload travel and controlled stop without creating a new problem?
Glossary
- Slope-driven transport
- The height difference provides gravitational energy.
- Input
- The action or energy supplied to a system; here it is release from the raised end of a sloped line.
- Output
- The useful response produced by a system; here it is payload travel and controlled stop.
- Efficiency
- The fraction of input energy that becomes useful output instead of friction, sound, heat, or unwanted motion.
Build your dreams
One build can start the next.
Share what you learned, change one variable, and help another builder understand what worked.
Explore more guidesSources and build notes
A common classroom engineering challenge implemented with original constraints, diagrams, and measurement guidance.
- Classroom challenge basis: A controlled-variable engineering activity with original constraints, scoring ideas, and measurement guidance.
Written and edited by BrickLabClips. Published 2026-07-22; updated 2026-07-22.
Next builds
Related guides
Classroom Rescue Device
Design a remote tool that retrieves a model supply package from a taped hazard zone without crossing the boundary.
Pulley Elevator
Raise a small platform with fixed and movable pulleys, then compare input force, rope travel, and mechanical advantage.
Classroom challengesFriction Investigation Sled
Pull the same weighted sled across different surfaces and measure the force needed to start and sustain motion.